(Author: Manfred Schmid)
Last update: 1 Dec 2013
This tutorial describes how to run uClinux on a NIOS processor in an
Altera FPGA.
How to setup the NIOS is described comprehensively in the Altera
documentation and therefore is covered here
only briefly. The main part deals with how to load and run uClinux on
the NIOS and how to customize the system.
Check out also the Forum and theWiki
that deal with this topic.
Commands are written
with a fixed size font with an Cmd: indicator symbolizing the Command
prompt.
Lines in a file are diplayed in blue
color.
Paths and files are displayed in italic.
Text to be entered in edit boxes is
displayed in red.
The Nios2 is a 32bit Softcore processor for Altera FPGAs.
The FPGA used is the Cyclone2 EP2C35.
The Evaluation Boards used are:
The uClinux used are:
Software Requirements:
First I started to use the Windows IDE with the Eclipse plugins from
Microtronix with Kernel version 2.6.11.
Because I needed a system that completely runs in RAM I wanted to use
initramfs.
Unfortunately a system with initramfs fails to compile on Cygwin (see
below).
For this reason I changed my developement environment to Linux and the
buildroot approach.
The buildroot approach from Hippo (Nios-Forum) uses the same
Microtronix port as the Windows IDE.
Later I wanted to update my kernel to 2.6.17 because of USB drivers I
needed.
So I switched over to uClinux-dist with the patch from Nios-Forum.
Another kernel update (this time because of YAFFS and 2048 byte page
nandflash) made another switch necessary.
I use now the uClinux-dist as described in the Nios-Wiki with kernel
2.6.23.
uClinux can only be installed if the board comes with a 4Mbyte CFI
Flash (U20: 29AL032).
We will make 2 partitions of 2 MB each later.
The Linux kernel occupies about 1.7 MB space.
The DE2 has following features among others:
In order to be able to compile the kernel for a Nios II system it is
necessary to do some work in Quartus and SOPC Builder first.
To begin with we need to build a SOPC system.
Copy the example DE2_NIOS_HOST_MOUSE_VGA into a directory of your
choice that does not contain spaces (for example: c:\altera\80\qdesigns)
Open the project DE2_NIOS_HOST_MOUSE_VGA.qpf with the Quartus
IDE.
Change to SOPC Builder. (Tools => SOPC Builder)
In order to get a valid nios_0.ptf file we need to make a
board description first.
From the File Menu choose:
File => New Board Description.
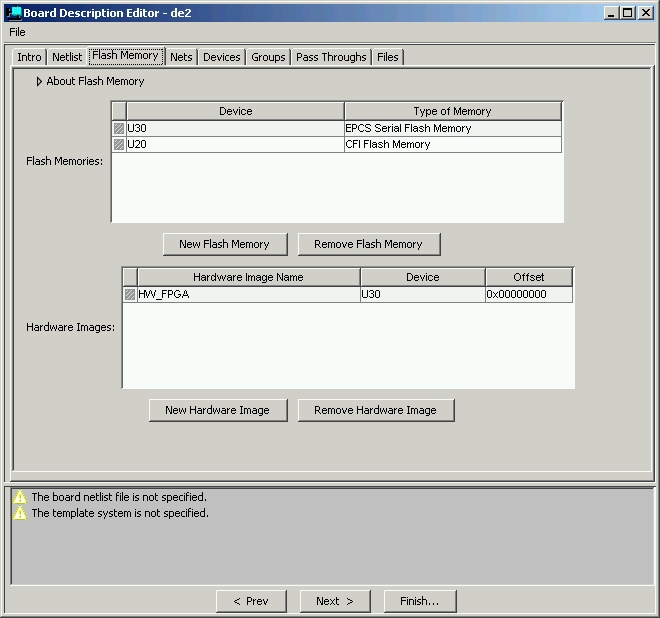
The only thing that needs to be filled in are the flash devices. (See
Screenshot) in the Flash Memory-Tab.
In SOPC Builder select the "de2" as your board.
In order to get the components right, download the nios_0.ptf
file from the download section and place it
into your project directory.
Also copy the files DE2_NIOS_HOST_MOUSE_VGA.v,ISP1362_IF.v and DM9000A_IF.v
from the download section into your project
directory.
Copy the directory user_logic_DM9000A from the Network example
into your project.
Open the "Board Settings" and change everything to be assigned by
Quartus. The Icons should turn green or yellow then.
Start the SOPC builder now by pressing the generate button.
The SOPC Builder produces following files:
Note that the CFI Flash is at address 0x2000000. This base address
is used in all example scripts. If you change this address you need to
adjust the base address in the commands.
The next step is to generate an sof file (SRAM Object File) to be
uploaded into the FPGA.
Because there is no Nios License, we will only be able to produce a
time limited sof, which will do for evaluation.(The Nios License costs
about $500.)
In the Assignment Editor (Assignment => Assignment Editor) we need
to assign the pins for the DM9000A and the Expansion Header.
It is necessary to specify some max timings for the FPGA. Open
Assignment => Timing Settings:
Set in Timing Requirements & Options: all to 5 ns and frequency to
50 MHz.
Set in Analysis & Synthesis Settings: Optimization for Speed.
It is time to start compilation.
Upload the sof-file to the FPGA with the Quartus programmer. (Tools
=> Programmer).
The board has following features among others:
Step by step guide to load uClinux into DDR RAM and start it from there.
1. Open C:\altera\80\nios2eds\examples\vhdl\niosII_cycloneII_2c35\full_featured\NiosII_cycloneII_2c35_full_featured.qpf
2. Open Tools => Programmer and upload NiosII_cycloneII_2c35_full_featured.sof with the USB-Blaster
3. I assume that the uClinux-dist has been already downloaded to
your Linux developement PC
Go to the directory ~/uClinux-dist and run
Cmd: make clean
4. Link uClinux to the HW by running
Cmd: make vendor_hwselect
SYSPTF=NiosII_cycloneII_2c35_full_featured_sopc.ptf
5. Compile uClinux by running
Cmd: make NON_SMP_BUILD=1
6. Upload the zImage to your board with the Nios II 8.0 Command
Shell by typing
Cmd: nios2-download -g zImage
In the above setup I assumed that the DDR core from Altera is used.
This is available from Altera as a time limited evaluation IP.
The Altera DDR core works fine for the 2 evaluation boards.
However I made my own hardware and used DDR2 for the Nios. The
Altera IP does support DDR2 for Cyclone II but is very slow.
Microtronix
provides a fast IP for both DDR2 and DDR. You can get a 30 day
evaluation license to try it out. I tried this out successfully.
However later on having units in the field, there turned out to be a
temperature related problem with the Mictrotronix IP above ambient temp
of about 30C ( 51C at the FPGA surface)
The DDR2 failed and Linux crashed.
With version 5.1.1 of the memory controller IP the temperature issue is
solved and the IP runs fast and stable.
For production I recommend to use the Microtronix IP.
Another advantage of the Microtronix IP is that it provides multiple
ports. For best results connect the Nios Instruction Master to port A
and the Nios Data Master to port B.
For Cyclone III devices Altera provides an DDR/DDR2 High Performance Controller.
The Linux-uClinux-dist approch should now be used because it
integrates kernel and application developement.
The other systems are deprectated, but I keep them in the archive.
uClinux-dist-20071107 with Kernel 2.6.23
This is now the recommended approach to get an embedded Linux system on the Nios.
Differences to the deprecated Windows - Microtronix and Linux - Buildroot system are:
As always I give here a short summary of how to install the
developement environment:
(A detailed description can be found on Nios-Wiki.)
Download the binary toolchain and put it in ~/download.
Install it:
Cmd: su
Cmd: cd ~/download
Cmd: tar jxf nios2gcc.tar.bz2
-C ~
Cmd: exit
The cross compiler tools will be in ~/opt/nios.
Update the path in ~/.bash_profile:
PATH=$PATH:$HOME/bin:$HOME/opt/nios/bin
Attention: Remove the path to
$HOME/buildroot/build_nios2/staging_dir/bin, if you used the Linux -
Buildroot system
Download the GIT archive from the Altera FTP server (does not allow browsing):
Now expand the file into your home directory:
Cmd: tar jxf
uClinux-dist-20071107.tar.bz2
Cmd: cd uClinux-dist
Cmd: git checkout v2.6.23-uc
Select the target: Altera, nios2nommu
NOTE, Libc MUST be (None) !!! Because we will use the uClibc built in
the cross gcc with buildroot. We don't use the uClibc come with
uClinux-dist.
Vendor/Product Selection --->
--- Select the Vendor you wish to target
(Altera) Vendor
--- Select the Product you wish to target
(nios2nommu) Altera Products
Kernel/Library/Defaults Selection --->
(linux-2.6.x) Kernel Version
(None) Libc Version # MUST be None !!!
[*] Default all settings (lose changes)
[ ] Customize Kernel Settings
[ ] Customize Vendor/User Settings
[ ] Update Default Vendor Settings
Then <exit> <exit> <yes>
DO NOT change any other setting until first successful boot.
Note: The default settings are stored in
~/uClinux-dist/vendors/Altera/nios2nommu in the files
config.linux-2.6.x
config.vendor
config.uClibc
Cmd: make vendor_hwselect SYSPTF=your_system.ptf
Now compile:
Cmd: make NON_SMP_BUILD=1
Upload the file to your target:
From the NiosII 7.2 Command Shell:
Cmd: nios2-download -g zImage
You should see Linux booting.
A lot of Linux tools are available. The tools are available as
sourcecode packages. The difficult task is now to compile them for the
Nios2 processor.
The sourcecode usually does not need to be changed. It is the Makefile
that needs some tweeking.
There are mainly 3 places where to find applications.
1) uClinux-dist. Many applications can be found in the directory ~/uClinux-dist/user
2) Buildroot. These packages come in form of a tar.gz and are
downloaded with wget from some place in the internet. Additionally
packages, not available in the buildroot environment, can be downloaded
aswell.
3) Microtronix. Applications can be found in c:\altera\72\nios2eds\examples\software\linux
The task is to change the Makefile. In general following needs to be
added or changed:
- Compiler. The makefiles use the host compiler but the Nios needs the
cross compiler.
- CFLAGS. Special flags are needed to compile for embedded.
- ELF. The output format needs to be changed to FLAT binary format.
uClinux-dist-20071107 with Kernel 2.6.23
Tweeking the makefiles is no longer necessary. Because a common
makefile is used to compile both Kernel and Applications, most
applications selected in menuconfig will compile out of the box.
For customizing the build following files or directories are important:
| File/Directory | Purpose |
|---|---|
| ~/uClinux-dist/Makefile | create make shortcuts |
| ~/uClinux-dist/linux-2.6.x/.config | configure kernel (created with make menuconfig) |
| ~/uClinux-dist/config/.config | configure userspace (created with make menuconfig) |
| ~/uClinux-dist/config/autoconf.h | headerfiles with defines of userspace configuration |
| ~/uClinux-dist/user/Kconfig | add applications |
| ~/uClinux-dist/user/Makefile | add applications |
| ~/uClinux-dist/vendors/Altera/nios2nommu/config.arch | add system libraries or compilerflags |
| ~/uClinux-dist/vendors/Altera/nios2nommu | add files to romfs |
| ~/uClinux-dist/vendors/Altera/nios2nommu/Makefile | add files to romfs |
The normal make process takes rather long and extends turn-around
times when developing an application or a driver. Therefore I created
some additional make targets to cut down turn-around time:
Edit the overall makefile:
~/uClinux-dist/Makefile
1) Add a toplevel make target after all:
all: ucfront cksum subdirs romfs image
else
all: config_error
endif
my: apps romfs image
This new target will compile the applications, then update romfs and
then build the kernel.
apps will be called instead of subdirs.
2) Add a target apps after subdirs:
.PHONY: subdirs
subdirs: #linux modules
for dir in $(DIRS) ; do [ ! -d $$dir ] || $(MAKEARCH) -C $$dir || exit
1 ; done
.PHONY: apps
apps: #linux modules
for dir in $(APPDIRS) ; do [ ! -d $$dir ] || $(MAKEARCH) -C $$dir ||
exit 1 ; done
The # infront of linux modules prevents the kernel from being
build twice.
3) Add APPDIRS after DIRS:
DIRS = $(VENDOR_TOPDIRS) include lib include user
APPDIRS = $(VENDOR_TOPDIRS) user
Call this maketarget whenever you work on applications in userspace.
Cmd: make my
A shortcut for making the kernel is allready present:
Cmd: make image
Cmd: make menuconfig
Now select:
Kernel/Library/Defaults Selection --->
[*] Customize Kernel Settings
Then <exit> <exit> <yes>
This opens the menuconfig menu for Kernel settings:
Minimum
Kernel Config for 2.6.17
Minimum Kernel Config for 2.6.23
The resulting .config file can be found in ~/uClinux-dist/linux-2.6.x
Cmd: make menuconfig
Now select:
Kernel/Library/Defaults Selection --->
[*] Customize Application/Library Settings
Then <exit> <exit> <yes>
This opens the menuconfig menu for Userspace settings:
Be aware that applications choosen automatically end up in ~/uClinux-dist/romfs,
nothing should ever be copied into
~/uClinux-dist/romfs by hand because this directory is
autogenerated by the makefile.
Minimum Userspace Config for
uClinux-dist-20071107 with Kernel 2.6.23
The resulting .config file can be found in ~/uClinux-dist/config
It is possible to add your own applications to the system:
What you need is the sourcecode for your application, an entry in the ~/uClinux-dist/user/Makefile
and an entry in the ~/uClinux-dist/user/Kconfig file
1) Create a directory in ~/uClinux-dist/user for example mycompany
2) Create a directory for your application in ~/uClinux-dist/user/mycompany
for example myapplication
3) Put your application c File into ~/uClinux-dist/user/mycompany/myapplication
for example myapp.c
4) Create a Makefile in ~/uClinux-dist/user/mycompany/myapplication
by copying a Makefile from some simple application for example ping
5) Add following lines to ~/uClinux-dist/user/Kconfig
menu "My Applications"
config USER_MYCOMPANY_MYAPPLICATION
bool "myapp"
help
some help text
endmenu
6) Add following line to ~/uClinux-dist/user/Makefile
dir_$(CONFIG_MYCOMPANY_MYAPPLICATION) +=
mycompany/myapplication
Now you can select your application in make menuconfig, it will be
automatically build and added to romfs
A) Library already provided in /opt/nios2/lib directory
As example we will add the libpthread, a lib that is already in the
1) in the Makefile of your application add
$(EXEC): $(OBJS)
$(CC) $(LDFLAGS) -o $@ $(OBJS) $(LIBPTHREAD) $(LDLIBS)
2) in ~/uClinux-dist/vendors/Altera/nios2nommu/config.arch
add
LIBPTHREAD = -lpthread
Note: I changed GCC_LIB = ~/buildroot/build_nios2/stagging_dir/lib
into
GCC_LIB = ~/opt/nios2/lib
I think this has been overlooked when porting from buildroot to
uClinux-dist approach.
B) Library not yet in /opt/nios2/lib directory, but available in menuconfig
As example we add the libpng library.
Cmd: make menuconfig
[*] Custmize Application/Library Settings
Then <exit> <exit> <yes>
Library Configuration --->
[*] Build libpng
Then <exit> <exit> <yes>
Cmd: make
Cmd: mv
~/uClinux-dist/lib/libpng.a /opt/nios/lib
Proceed with A)
C) Library not yet in /opt/nios2/lib and not available in menuconfig
As example we add the library libxml2.
Download the file libxml2-2.7.2.tar.gz from ftp://xmlsoft.org/libxml2
Unzip the package into the ~/uClinux-dist/lib directory
Cmd: tar -xzf
libxml2-2.7.2.tar.gz
In case the package has a config.sub file and a configure script we are
lucky.
In order to compile for the Nios2 we need to adjust the config.sub file
first and then run configure with some options to generate the Makefile.
In config.sub add the nios2 in the supported architectures, if it is
not already supported (lately it is, search for nios2, if found you are
done with this file)
find the line:
case $basic_machine in
and add nios2 to the list.
Replace:
| z8k )
with
| z8k \
| nios2 )
Now run the configure script with following options
Cmd: ./configure
--host=nios2-linux --with-cc=nios2-linux-gcc
--with-cflags="-D__uClinux__ -DUSE_VFORK -Dfork=vfork" --disable-shared
--enable-static --with-endianness=little
--with-ldflags="-elf2flt=-s16000"
if it does not compile add also "--without-threads" to
the above commandline
To add the library to menuconfig edit the Kconfig and Makefile in ~/uClinux-dist/lib
Proceed as in B)
Note: an application that uses the libxml2 must also link the mathematic library libm.a. (add libm as described in A) )
Compilerflags are defined in
~/uClinux-dist/vendors/Altera/nios2nommu/config.arch
in section CFLAGS flags can be added
I had trouble with some applications that I ported from Microtronix and
buildroot, the flag __UCLINUX__ was defined uppercase whereas now it is
defined __uClinux__ mixed case
I changed the define in the application and not in config.arch
I define userspace files as files that need not to be compiled like
the rc script or html pages for the webserver.
How to add:
1) Add the files in ~/uClinux-dist/vendors/Altera/nios2nommu
2) Modify ~/uClinux-dist/vendors/Altera/nios2nommu/Makefile
Directories for romfs are defined in
ROMFS_DIRS
add or remove directories as needed
Place your userspace files into their final directories with entries
like the following example:
$(ROMFSINST) /home/httpd/index.html
start.c: main()
~\linux-2.6.x\arch\nios2nommu\kernel\start.c
main-function starts start_kernel()
main.c: start_kernel()
~\linux-2.6.x\init\main.c
start_kernel starts setup_arch to deal with processor specific details.
setup.c: setup_arch()
~\linux-2.6.x\arch\nios2nommu\kernel\setup.c
Processor specific details are defined here.
.config:
d:\altera\72\nios2eds\bin\eclipse\workspace\<kernel
project>\build \.config
or
~/linux-2.6.x/.config
This file will be in your project directory and is the output of
Menuconfig.
Kconfig:
These are files in each directory that make up menuconfig
nios2_system.h
c:\altera\kits\nios2_51\bin\eclipse\workspace\<kernel
project>\build\include\nios2_system.h
or
~/linux-2.6.x/include/nios2_system.h
This file is the link from the HW to the SW.
Perlscripts produce this file from nios_0.ptf.
All HW addresses and memory spaces are defined here.
Note: Nios IO adresses have the MSB set. The MSB is an indicator that
caching should be bypassed.
Example: 0x00A00000 gets translated to 0x80A00000. Actually this would
only be necessary for the fast Nios version, it gets ignored for the
standard version.
io.h
~\linux-2.6.x\include\asm-nios2nommu\io.h
Access to the HW is defined in this file as macros.
Note: The Altera HAL is not used in uClinux.
Initramfs is a RAM filesystem that was introduced with 2.6 kernels.
It is very convenient to use because it is part of the kernel image, so
no seperate kernel image and filesystem image is needed.
The initramfs is added to the kernel as a compressed archive.
It is always present in 2.6 kernels. When Linux boots it searches this
archive and looks for an executable file "init" in the root directory.
If "init" is not present, the kernel goes on and tries to mount the
filesystem that is specified in the root= boot parameter as
rootfilesystem..
If "init" is present Linux mounts initramfs as rootfilesystem and
executes the "init" executable.
Other filesystems can be mounted later in user space or within the
"init" script.
The archive's name is initramfs_data.cpio.gz
The Linux buildroot automatically handles this file for you.
All you need to do is copy the files that should make up the
rootfilesystem into the directory ~/rootfs.
When the kernel is build the archive automatically gets produced and
added.
The archive is in ~/linux-2.6.x/usr
Inspecting the archive works like this:
Cmd: cp initramfs_data.cpio.gz
/tmp/initramfs
Cmd: cd /tmp/initramfs
Cmd: zcat
initramfs_data.cpio.gz | cpio -i -d -H newc --no-absolute-filenames
Using the commandline to produce the archive works like this:.
(This is just for information. The kernel's makefile creates the
archive for you.)
Cmd: cd ~/rootfs
Cmd: find . | cpio -o -H newc |
gzip > ../initramfs_data.cpio.gz
To add the archive to the kernel image the assembler directive
incbin is used.
The file initramfs_data.S specifies the path to the archive.
If you want to include a different archive change the path incbin
points to.
Note:
It is not possible to use the Windows IDE to build initramfs.
2 bugs make it impossible.
1st: The Microtronix IDE produces a corrupted archive.
When Linux starts this archive you get the message:
Kernel panic - not syncing: junk in compressed archive
2nd:
If you overcome this problem by creating the archive under Linux, then
the 2nd problem kicks in.
If the archive is bigger than approx 100k you get following compiler
warning:
Warning: truncated file 'initramfs_data.cpio.gz', 192333 of 192335
bytes read
This is due to a bug in as.exe on Cygwin
The Microtronix port does not support zImage, the directory ~/linux-2.6.x/arch/nios2nommu/boot
is missing.
In the buildroot approach this directory has been added.
zImage is a compressed kernel Image. The advantage is that it is much
smaller than the uncompressed image vmlinux.
This saves space in the Flash.
The Linux kernel takes care of expanding the image at boot.
An additional layer is added to expand the kernel and place it into RAM.
The file ~/linux-2.6.x/arch/nios2nommu/boot/compressed/head.S
is the first code that gets executed.
The function decompress_kernel expands the kernel and places it at the
RAM start address.
The zImage needs to be loaded at a higher address in RAM in order to
give the uncompressed kernel unused RAM space.
When configuring the kernel this address is set in:
Processor type and features ===>
(0x0800000) Link address offset for booting
0x0800000 is the default and means that the zImage is loaded at this
address.
Note: for the DE2 board which has only 8 MB of RAM this address must be
changed to 0x0500000 giving the compressed kernel a maximum of 3 MB and
the uncompressed kernel a maximum of 5 MB.
The ~/linux-2.6.x/arch/nios2nommu/boot/compressed/head.S is
also linked at this address. Therefore you must jump to this address to
get the expansion process startet.
Note: the ~/linux-2.6.x/arch/nios2nommu/boot/compressed/head.S
is not the same as ~/linux-2.6.x/arch/nios2nommu/kernel/head.S
The 1st one is responsible for decompressing the kernel, whereas the
2nd one is the startup routine of the decompressed kernel.
Startup:
1) Load the compressed kernel zImage at the "link address offset for
booting"
2) Jump to this address
3) ~/linux-2.6.x/arch/nios2nommu/boot/compressed/head.S gets
executed and decompresses the kernel and loads it at the RAM start
address.
4) After decompression a jump to RAM start address is performed.
4) ~/linux-2.6.x/arch/nios2nommu/kernel/head.S is executed and
starts the kernel.
How to load the kernel into RAM:
With the Altera tools this can be achived with the command:
Cmd: nios2-download -g zImage
This uploads the kernel into RAM and starts it at the "link address
offset for booting"
How to load the kernel into Flash:
The zImage is in elf format, therefore we need to convert it to bin.
Also the zImage does not relocate itself, therefore an additional
bootloader is needed to copy the zImage to RAM start address + link
address offset for booting.
With the Altera tools this can be achived with the command:
Cmd: elf2flash --base=0x0
--end=0xffffff --reset=0x0 --input=zImage --output=zImage.flash
--boot=$SOPC_KIT_NIOS2/components/altera_nios2/boot_loader_cfi.srec
Upload the kernel with:
Cmd: nios2-flash-programmer
--base=0x0 zImage.flash
Be careful that the compressed zImage does not overlap the
uncompressed kernel.
Use nios2-elf-objcopy to find out the length of each.
Cmd: nios2-elf-objcopy -O
binary ~/linux-2.6.x/vmlinux /tmp/vmlinux.bin
for the length of the uncompressed kernel and
Cmd: nios2-elf-objcopy -O
binary ~/linux-2.6.x/arch/nios2nommu/boot/zImage /tmp/zImage.bin
for the length of the compressed kernel.
Cmd: ls -l /tmp
The question of what to enable and what not in menuconfig is a
little tricky.
Here is a list of features that need to be enabled for the smallest
possible kernel.
The list was found by experiment and covers the case of a system with
initramfs (means no mtd).
Only the items that need to be enabled are mentioned here, all others
have to be left unchecked:
General setup ===>
[*] Initial RAM filesystem and RAM disk (initramfs/initrd) support
(../romfs ../vendors/Altera/nios2nommu/romfs_list) Initramfs source file(s)
[*] Configure standard kernel features (for small systems) ===>[*] Enable support for printk
[*] BUG() support
Choose SLAB allocator ===>(X) SLAB
[*] Enable the block layer ===>
IO Schedulers ===>
[*] Deadline I/O scheduler
Processor type and features ===>
CPU ===>
(X) NIOS2
Platform ===>
(X) Altera DE2 Developement board support
Nios II Hardware Multiply Support ===>
(X) Enable mul instruction
Kernel executes from ===>
(X) RAM
Preemption Model ===>
(X) No Forced Preemption (Server) *)
Timer frequency ===>
(X) 100 HZ
(0x0500000) Link address offset for booting
Exectutable file formats ===>
[*] Kernel support for flat binaries
[*] Enable ZFLAT support
Device Drivers ===>
Character devices ===>
Serial drivers ===>
[*] Altera JTAG UART support (for the nios2-terminal)
OR:
[*] Nios serial support
[*] Support for console on Nios UART (for Hyperterminal)
File systems ===>
Pseudo filesystems ===>
[*] /proc file system support
[*] sysfs file system support
*) if Preemption is selected, device drivers must be written with concurrency in mind (Spinlocks must be used)
Core Applications ===>
[*] init
[*] enable console shell
[*] sash ps
BusyBox ===>
[*] BusyBox
Busybox Settings ===>
Build Options ===>
[*] Build BusyBox as static binary (no shared libs)
Installation Options ===>
Applets links ===>
(X) as soft-links
Linux System Utilities
[*] mount
Network Utilities
[*] ifconfig
[*] Enable status reporting output (+7k)
[*] Enable option "hw" (ether only)
[*] netstat
[*] ping
[*] routeShells
Choose your default shell ===>
(X) none
Miscellaneous Configuration ===>
RAMFS Image ===>
(X) none
Note: sash has built in applications like rm or cp. The sash built
in applications have even fewer options than the busybox applications.
The mount command in sash for example has no -o flags, therefore it
might be that sometimes the busybox version or even a standalone
version of an application might be needed.
Applications supported by sash can be found out by typing help on the
embedded Linux prompt.
Cmd: help
To enable the DM9000A network chip on board it is necessary to
enable following features in the kernel.
Turn on (All other items are off):
In Menuconfig following needs to be enabled for kernel 2.6.17:
In Menuconfig following needs to be enabled for kernel 2.6.23:
Networking ===>
Networking support
Networking options ===>
[*] Packet socket
[*] Unix domain sockets
[*] TCP/IP networking
Device Drivers ===>
[*] Network device support ===>
[*] Ethernet (10 or 100 Mbit) ===>
[*] DM9000A with checksum offloading
Note:
The name of the device in SOPC builder must be dm9000 all lowercase.
The default component name is uppercase and leads to a compiler error,
because the name of SOPC builder gets included in the nios2_system.h
headerfile.
It is easy to edit the name in SOPC builder.
Important Note:
There is a 3rd driver available which supports checksum offloading
(dm9ks.c). It is recommended to use this driver from now on because it
is a port from the chip manufacturer's driver (www.davicom.com.tw)
[X] DM9000A with checksum offloading
I had though troubles to use the driver in production because of 2
problems.
1) With the Nios2 Fast processor at 88 MHz the driver does not work
correctly and outputs garbage onto the network after a while.
The reason is that in the dmfe_start_xmit function the interrupts are
disabled too late. (This is true for dm9ks.c and dm9000.c)
2) Another problem is the CONT_RX_PKT_CNT handling (dm9ks.c only)
This value is 10 in the 2.6.17 and 2.6.19 kernel sources. The
manufacturer has changed this value to 0xFFFF in the meantime, which is
right and means disabled.
To avoid future troubles I removed the CONT_RX_PKT_CNT handling from
the ISR function.
It does not make sense to disable receive in the interrupt mask,
because the RX SRAM will still be filled.
Support for the new DM9000B chip is also added.
Download the fixed version from the download section.
To set a valid MAC address do following:
Cmd: ifconfig eth0 down
Cmd: ifconfig eth0 hw ether
xx:xx:xx:xx:xx:xx
Cmd: ifconfig eth0 up
Kernel 2.6.11 and 2.6.17
Kernel 2.6.23
Driver included
There is 2 technologies for blockdevices:
When USB Block device is choosen then it overrules the SCSI settings, that means your driver will use /dev/uba instead of /dev/sda.
In Menuconfig following needs to be enabled for SCSI and UBA:
Device Drivers ===>
USB support ===>
[*] Support for Host-side USB
[*] USB device filesystem
[*] USB Mass Storage support
[*] ISP1362 HCD support
File Systems ===>
Native Language Support ===>
[*] Codepage 437 (United States, Canada)
[*] NLS ISO 8859-1 (Latin 1; Western European Languages)DOS/FAT/NT Filesystems --->
[*] VFAT (Windows-95) fs support
In Menuconfig following needs to be enabled for USB Block Device:
Device Drivers ===>
Block devices ===>
[*] Low Performance USB Block driver
In Menuconfig following needs to be enabled for SCSI Device:
Turn off:
Device Drivers ===>
Block devices ===>
[ ] Low Performance USB Block driver
Turn on:
Device Drivers ===>
SCSI device support ===>
[*] SCSI device support
[*] SCSI disk support
When you compile the kernel the driver should work with either
configuration.
Following messages should show up when Linux boots:
...
driver isp1362-hcd, 2006-04-28
datastart=80900080,dataend=80900083,adrstart=80900084,adrend=80900087,irq=4
ISP1362 Host Controller, irq 4
isp1362-hcd isp1362-hcd: new USB bus registered, assigned bus number 1
chipID=3630
isp1362-hcd isp1362-hcd: ISP1362 Memory usage:
isp1362-hcd isp1362-hcd: ISTL: 2 * 256: 512 @ $0000:$0100
isp1362-hcd isp1362-hcd: INTL: 16 * ( 64+8): 1152 @ $0200
isp1362-hcd isp1362-hcd: ATL : 32 * ( 64+8): 2304 @ $0680
isp1362-hcd isp1362-hcd: USED/FREE: 3968 128
usb usb1: Product: ISP1362 Host Controller
usb usb1: Manufacturer: uClinux 2.6.11-uc0 isp1362-hcd
usb usb1: SerialNumber: isp1362-hcd
hub 1-0:1.0: USB hub found
hub 1-0:1.0: 2 ports detected
Initializing USB Mass Storage driver...
usbcore: registered new driver usb-storage
USB Mass Storage support registered.
usbcore: registered new driver hiddev
usbcore: registered new driver usbhid
/cygdrive/d/altera/kits/nios2_51/bin/eclipse/plugins/com.microtronix.nios2linux.
kernel_1.4.0/linux-2.6.x/drivers/usb/input/hid-core.c: v2.0:USB HID
core driver
...
Another USB chip from Philips that supports USB 2.0.
It has 3 ports:
1 Hostcontroller
1 OTG
1 Device
The OTG can be both device or host.
The sourcecode for the host and the device can be downloaded from the download section.
Create a directory ~/uClinux-dist/linux-2.6.x/drivers/usb/pehcd
and copy the contents of the pehcd directory into it
Copy the isp1761.h into ~/uClinux-dist/linux-2.6.x/include/linux/usb
Copy the usb.c into ~/uClinux-dist/linux-2.6.x/arch/nios2nommu/kernel
Add a section pehcd in the Kconfig file and edit the Makefile (see
provided examples) .
The diskemu is a mass storage device for demo. Create a device in the
dev directory to use it.
Status of the driver:
- Host fully functional
- OTG is not supported
- Device fully functional
Note: When first porting the Philips sources we encountered the
problem that the probe function was not called.
In a driver it is important that the device name string matches:
static struct platform_driver
isp1761_platform_driver
.name = "isp1761-hcd";
must match with the name in the probe function:
static int __devinit isp1761_probe (struct
platform_device *pdev) {
...
res = platform_get_resource_byname(pdev, IORESOURCE_MEM, "isp1761-hcd");
...
}
otherwise the probe function will not be called!
Menuconfig:
Instead of ISP1362 chose ISP1761
Enabling the Host:
Device Drivers ===>
USB support ===>
[*] ISP1761 Philips Host Control Driver
[*] ISP1761 HCD HAL for Nios2
[*] Philips EHCI (pehci) driver
[*] Philips Device driver
Enabling the Device:
Device Drivers ===>
USB support ===>
[*] ISP1761 Philips Host Control Driver
[*] ISP1761 HCD HAL for Nios2
[*] Philips EHCI (pehci) driver
[*] Philips Device driver
[*] Philips Mass Storage class driver
The Philips Mass Storage class driver enables a 8MB disk (for demo
purpose)
Note: The diff file provided in the download section is the difference
to my previous version.
To test USB, the easiest is to connect a USB mouse.
The mouse I connected is an optical mouse from Dell.
When applying following command
Cmd: cat /dev/input/mice
you should see some garbic characters when moving the mouse. It is
likely that this will reset your terminal.
My experience shows that not all memory sticks work with the 2.6
kernel.
A 128MB Memory Stick from IOmega worked best.
It depends on the Block decvice you have chosen in the kernel
Menuconfig how to mount:
/dev/uba (USB Low Performance Block Device):
In the filesystem following device nodes need to be added:
/dev/uba, /dev/uba1
Microtronix:
Open the Nios II SDK Shell and change directory to: c:\altera\72\nios2eds\bin\eclipse\workspace\<filesystem
project>\target\dev
Cmd: touch @uba,b,180,0
Cmd: touch @uba1,b,180,1
Create the mount point by adding directory usb to the /mnt:
Cmd: cd /mnt
Cmd: mkdir usb
uClinux-dist:
Open ~/uClinux-dist/vendors/Altera/nios2nommu/romfs_list
nod /dev/uba 666 0 0 b 180 0
nod /dev/uba1 666 0 0 b 180 1
| major | minor | #blocks | name |
| 31 | 0 | 2048 | mtdblock0 |
| 31 | 1 | 2048 | mtdblock1 |
| 180 | 0 | 128000 | uba |
Now mount the USB stick:
Cmd: mount -n -t vfat /dev/uba
/mnt/usb
You should be able now to access the USB stick:
Cmd: ls /mnt/usb
/dev/sda (SCSI emulation):
In the filesystem following device nodes need to be added:
/dev/sda, /dev/sda1
Microtronix:
Open the Nios II SDK Shell and change directory to: c:\altera\72\nios2eds\bin\eclipse\workspace\<filesystem
project>\target\dev
Cmd: touch @sda,b,8,0
Cmd: touch @sda1,b,8,1
Create the mount point by adding directory usb to the /mnt:
Cmd: cd /mnt
Cmd: mkdir usb
uClinux-dist:
Open ~/uClinux-dist/vendors/Altera/nios2nommu/romfs_list
nod /dev/sda 640 0 0 b 8 0
nod /dev/sda1 640 0 0 b 8 1
Now build the filesystem upload it to the Flash and start Linux:
Attach the USB stick.
A sda partition should be created automatically:
Test it with
Cmd: cat /proc/partitions
| major | minor | #blocks | name |
| 31 | 0 | 2048 | mtdblock0 |
| 31 | 1 | 2048 | mtdblock1 |
| 8 | 0 | 128000 | sda |
Now mount the USB stick:
Cmd: mount -n -t vfat /dev/sda
/mnt/usb
You should be able now to access the USB stick:
Cmd: ls /mnt/usb
The document ~/linux-2.6.x/Documents/usb/usbmon.txt describes how to use USB-Mon to log USB traffic between host and device.
2.6.17
The document is straight forward but I stumbled over one problem:
How to enable debugfs?
It cannot be found in menuconfig. By searching on the internet I found
out where it should be enabled.
The debugfs should be found under Kernel hacking.
Because I had no idea how the Kconfig.debug system has to be enabled I
did a hack.
I patched ~/linux-2.6.x/arch/nios2nommu/Kconfig by doing following:
Take the 2 necessary sections DEBUG_FS and DEBUG_KERNEL from
~/linux-2.6.x/lib/Kconfig.debug
and insert them in ~/linux-2.6.x/arch/nios2nommu/Kconfig in section
menu "Kernel hacking"
Now when you do menuconfig you should be able to select:
2.6.23
Debug Filesystem option exists.
Kernel hacking ===>
[*] Kernel debugging
[*] Debug Filesystem
You also need USB-Mon and sysfs enabled:
Device Drivers ===>
USB Support ===>
[*] USB Monitor
File systems ===>
Pseudo filesystems ===>
[*] sysfs file system support
Compile the kernel and follow the kernel document.
I needed USB-Mon to debug a flaky USB stick from SanDisk.
I got the error message: can't set config #1, error -110
-110 is a timeout error. Because other sticks work well, it cannot be a
kernel problem per se.
After monitoring the traffic with USB-Mon I found out that the Linux
driver has difficulty to read the string descriptors from the stick.
Because string descriptors are not necessary for operation, I disabled
them in ~/linux-2.6.x/drivers/usb/core/message.c.
Without reading the string descriptors the stick worked.
BusyBox combines tiny versions of many common UNIX utilities into a
single
small executable. It provides minimalist replacements for most of the
utilities you usually find in bzip2, coreutils, e2fsprogs, file,
findutils,
gawk, grep, inetutils, less, modutils, net-tools, procps, sed, shadow,
sysklogd, sysvinit, tar, util-linux, and vim. The utilities in BusyBox
often have fewer options than their full-featured cousins; however, the
options that are included provide the expected functionality and behave
very much like their larger counterparts.
To call a busybox utility simply run the command with busybox as
prefix on the target platform.
Cmd: busybox <cmd>
for example:
Cmd: busybox uptime
2.6.17
2.6.23
Busybox configuration is included in Customize Application/Library
Settings
See Minimum Userspace Config for
recommended settings.
Take the file ntpclient.c from ~\uClinux-dist\user\ntpclient,
compile it and link it with the crosscompiler either in Altera IDE or
buildroot.
The ntpclient requires the port to the timeserver (UDP port 123) be
open, otherwise it will timeout by default after 10 min without action.
If you have a timeserver in place than run following commands:
Cmd: ntpclient -s -h
<timeserver IP>
to set the time and
Cmd: ntpclient -h
<timeserver IP>
to track the time every 10min by default.
The time you get is the UTC time.
In order to localize time with a timezone it is necessary to provide
timezone information in a file called TZ in /etc
The info in the TZ file is different from standard Linux, where
timezone information is in binary zone files.
The TZ file is a simple text file of 1 line with a newline character at
the end.
Note: Nothing is allowed after the newline character.
The following definition is an abbreviated version of the complete
description omitting formats that are not practical.
Format of the TZ timezone definition (spaces inserted for clarity, but
not allowed in the real file):
std offset dst offset, rule
The expanded format is as follows:
stdoffset[dst[offset][,start[/time],end[/time]]]
Where:
std and dst
Indicate no less than three, nor more than {TZNAME_MAX}, bytes that are
the designation for the standard ( std) or the alternative ( dst -such
as Daylight Savings Time) timezone. Only std is required; if dst is
missing, then the alternative time does not apply in this locale.
The string provided for the timezone name is arbitrary, but I recommend
to stick to timezones .
All characters in these fields shall be alphabetic characters from the
portable character set in the current locale.
The smallest allowed value for TZNAME_MAX is 6 (Posix definition).
offset
Indicates the value added to the local time to arrive at Coordinated
Universal Time. The offset has the form:
hh[:mm[:ss]]
The minutes ( mm) and seconds ( ss) are optional. The hour ( hh)
shall be required and may be a single digit. The offset following std
shall be required. If no offset follows dst, the alternative time is
assumed to be one hour ahead of standard time. One or more digits may
be used; the value is always interpreted as a decimal number. The hour
shall be between zero and 24, and the minutes (and seconds)-if
present-between zero and 59. The result of using values outside of this
range is unspecified. If preceded by a '-', the timezone shall be east
of the Prime Meridian; otherwise, it shall be west (which may be
indicated by an optional preceding '+' ).
Note: The +,- definition specifies east and west and not addition or
subtraction, so be careful. (UTC+1 translates to <Timezone
name>-1)
rule
Indicates when to change to and back from the alternative time. The
rule has the form:
date[/time],date[/time]
where the first date describes when the change from standard to alternative time occurs and the second date describes when the change back happens. Each time field describes when, in current local time, the change to the other time is made.
The format of date is as follows:
Mm.n.d
The d'th day (0 <= d <= 6) of week n of month m of the year (1
<= n <= 5, 1 <= m <= 12, where week 5 means "the last d day
in month m" which may occur in either the fourth or the fifth week).
Week 1 is the first week in which the d'th day occurs. Day zero is
Sunday.
The time has the same format as offset except that no leading sign (
'-' or '+' ) is allowed. The default, if time is not given, shall be
02:00:00.
Example:
Central European Time (CET)
Switches to Daylight saving time (CEST) on last Sunday in March at
02:00:00.
Switches back to standard time on last Sunday in October at 03:00:00.
CET-1CEST-2,M3.5.0/02:00:00,M10.5.0/03:00:00
or shorter with using the defaults
CET-1CEST,M3.5.0,M10.5.0/03
The OpenSSL library is needed for various applications like an SSL
enabled webserver or ssh.
The Microtronix applications do not include the openssl libraries
libssl.a and libcrypto.a.
Therefore its necessary to build them if we want to add SSL to boa
webserver or use ssh connection for file transfer.
We will use the Buildroot environment on the Linux machine.
First we need to patch the makefiles for Nios2.
This is described in the Nios Forum ===> Downloads ===> Post Your
Own IP ===> sshd on Nios II uClinux with buildroot
by Tschmelcher.
In the download section
there is a copy of the makefile patches together with the libraries in
binary form.
I also fixed a slight bug that prevented the compile to be completely
successful on the package.
Copy the files openssl.mk and openssl_configure.patch into the dir ~/buildroot/package/openssl
overwriting the original openssl.mk.
Now in ~/buildroot run
Cmd: make menuconfig
Choose the openssl package then exit
Cmd: make
This should build the libraries libssl.a and libcrypto.a
Copy this libraries into
c:\altera\kits\nios2_51\bin\eclipse\plugins\com.microtronix.nios2linux.uClibc_1.4.0\lib
for later use in the Altera IDE.
It is also necessary to include the openssl include files directory to
c:\altera\kits\nios2_51\bin\eclipse\plugins\com.microtronix.nios2linux.uClibc_1.4.0\include
Adding the openSSL library to the current compiler:
Download the libraries in binary form from the download section.
Add the libraries libcrypto.a and libssl.a to
/opt/nios2/lib
Create a directory openssl in /opt/nios2/include
Extract the headerfiles that you need from the openssl tarball file
version 0.9.7e and copy them to /opt/nios2/include/openssl
The Microtronix build comes with a port of Boa webserver.
This webserver is very fast and does not use fork to serve new users.
The Microtronix sources include Auth and SSL, unfortunately the
official sources on http://www.boa.org
do not.
Nevertheless the Microtronix port works.
Because there are some minor changes I made to make Auth and SSL work I
include my whole sources as a zip file in the download
section.
The IDE I use for compiling is the Altera IDE, therefore the makefiles
also only work on this platform.
Note: If you want to compile in buildroot environment then copy the
sources to ~/apps/boa but do not overwrite the makefiles.
Edit the Makefile in ~/apps/boa/src and change the lines for SSL to use
the static libs (see my Makefile for Altera IDE)
Make links to the libs and include directories for OpenSSL.
uClinux-dist-20071107:
On transition to uClinux-dist-20071107 boa webserver can be chosen from
the Customize Application/Library Settings.
However the boa webserver that comes with uClinux-dist is somewhat slow.
The port from Microtronix is very fast.
Therefore I ported the Microtronix webserver to uClinux-dist-20071107.
Get fast boa for uClinux-dist-20071107 form the download
section.
After enabling the Microtronix boa on uClinux-dist-20071107 I was
confronted with following errormessage:
"Authentication password file for /cgi-bin/ not found"
The solution was to copy the boa.conf file into /etc/config
To use authentication you need to enable the Auth directive in
boa.conf.
Format is "Auth <Directory> <PasswdFile>"
Example:
Auth / /etc/boa_passwd
/ ... means the document root directory
/etc/boa_passwd....the password file
For some reason the original source code accepted only one user with
username "passwd" when compiled with the EMBED flag.
passwd <encrypted user passwd>
with a space as delimiter between passwd and the encrypted password.
I changed this, so that htpasswd can be used to create the password
file.
The file format is then:
<username1>:<encrypt pwd1>
<username2>:<encrypt pwd2>
...more users...
In order to test the SSL a certificate is needed.
The easiest way is to create a self signed certificate.
If you will use the webserver commercially the self signed certificate
should be replaced by an official certificate later to avoid the
browsers message of untrusted certificates.
The output are 2 files, the certificate and the key in pem fileformat.
Generate Key:
Cmd: openssl genrsa -des3 -out
server.key 1024
For the passphrase just use anything you like, it will not be needed
later.
Generate Cert:
Cmd: openssl req -new -key
server.key -out server.csr
Answer the questions with your company information
Strip Passphrase:
Cmd: cp server.key
server.key.orig
Cmd: openssl rsa -in
server.key.orig -out server.key
Sign:
Cmd: openssl x509 -req -days
365 -in server.csr -signkey server.key -out server.crt
Rename server.crt into ssl_cert.pem
Rename server.key into ssl_key.pem
Install both files in /etc/config of the rootfs
To use SSL encryption for https, boa needs to be compiled with the
define -DSERVER_SSL=1
Make sure you have the openssl include files copied to
c:\altera\kits\nios2_51\bin\eclipse\plugins\com.microtronix.nios2linux.uClibc_1.4.0\include
and the static libraries libssl.a and libcrypto.a to
c:\altera\kits\nios2_51\bin\eclipse\plugins\com.microtronix.nios2linux.uClibc_1.4.0\lib
To compile the libraries see section OpenSSL or simply download the
binaries from the archive
download section.
When starting boa I got confronted with an error:
SSL_GET_NEW_SESSION:ssl session id callback failed:ssl_sess.c
which gave me a hard time to debug.
This error is reported from the libssl.
The error is the follow up from another error in the libcrypto, which
for some reason was not displayed:
SSLEAY_RAND_BYTES, PRNG not seeded:md_rand.c "You need to read the
OpenSSL FAQ, http://www.openssl.org/support/faq.html"
The FAQ tells that this is a problem with the device /dev/urandom
not found.
Creating the devices /dev/urandom and /dev/random
solved the problem.
Cmd: touch @random,c,1,8
Cmd: touch @urandom,c,1,9
I also added following directive to boa.conf just in case:
AddType application/x-x509-ca-cert cer
2.6.17
2.6.23
No longer an option.
CGI works well with boa. You find examples in ~/uClinux-dist/user.
I recommend using the cgihtml library.
However the version 1.65 that comes with the latest uClinux-dist is a
little outdated and has a memory allocation bug in function
parse_CGI_encoded.
Either you fix the bug by removing the line free(lexeme) in the while
loop or you update to version 1.69, where the bug has been fixed.
Telnet is a tool to connect to a remote computer.
It is a simple protocol without encryption.
Telnetd is the server-daemon.
Telnet is the client application.
First of all we need to compile telnetd and telnet for the Nios2:
I took telnetd from the Microtronix port in c:\altera\kits\nios2_60\examples\software\linux\apps.
I compiled the application with the Nios2 IDE.
telnetd gets startet by inetd.
Following line should be in the file /etc/inetd.conf:
telnet stream tcp nowait root /bin/telnetd
and following line in /etc/services:
telnet 23/tcp
Do not start telnetd from the commandline or rc file with:
/bin/telnetd &
telnetd gets started automatically if a connection is established from
a remote computer.
telnetd needs pty enabled.
Therefore it is necessary to enable the pty in the kernel.
Run menuconfig and add:
Device Drivers ===>
Character devices ===>
[X] Legacy (BSD) PTY support
(10) Maximum number of legacy PTY in use
I took telnet from uClinux-dist/user
To compile successfully I needed to change the makefile.
It is possible to use the libg.a or to just add the 3 files of the lib
to the telnet directory.
I decided to copy the 3 files into the telnet directory.
The diff file shows the changes in the Makefile (archive download
section).
Last step is to type make.
The dhcpcd that comes with the Microtronix build or from the
uClinux-dist sources is v.1.3.22-pl2.
This version has 1 bug and 1 disadvantage:
Bug: If more that 1 clients ask for a lease at the same time,
they get the same IP-Address.
Disadvantage: A timeout of indefinite is not supported, that
means if the client does not get a lease in a certain amount of time
dhcpcd exits.
(This can happen if the networkcable is not connected when the device
starts and is plugged in for example 1 hour later.)
I upgraded the version to fix the bug and support indefinite timeout.
The new version provided is close to v.1.3.22-pl4 of the official
dhcpcd sources.
Download the improved version from the download
section.
uClinux-dist-20071107:
Bug still exists, Disadvantage solved.
For benchmarks the Dhrystone is widely used.
Dhrystone allows to compare the performance of different platforms.
Altera measures the different types of Nios by their DMIPS number
(Nios/f about 95 DMIPS)
Enable Dhrystone in menuconfig
Cmd: make menuconfig
Miscellaneous Applications ===>
[X] dhrystone
DMIPS = Dhrystones per second / 1757.
I added these lines of code in dhry_1.c
printf ("DMIPS: ");
printf ("%7.1f \n", Dhrystones_Per_Second/1757);
The Dhrystone benchmark measures the process run time.
For some reason this worked on my custom board but not on the Altera
Cyclone II Dev Board.
To replace process time measurement by simple time measurement add
#define TIME in dhry.h
I measured 30 DMIPS with the Altera Cyclone II Dev Board and 47
DMIPS with my custom board.
To get a high DMIPS number it turned out that the Nios must be
generated with "Embedded Multipliers" enabled.
On our custom board we use a Nand512w3a which is a 64MB Nand for ST
Microelectronics.
The goal is to add it to the Nios and install a Flashfilesystem onto it.
Download file nand.zip for Step1 and Step2 from the download section.
Replace the Kconfig and Makefile and add nand512w3a.c in
~/linux-2.6.x/drivers/mtd/nand.
Add NAND_FLASH.v and NAND_FLASH_IF to your Quartus project.
Step1:
In SOPC Builder you need to create a component for the Nand,
NAND_FLASH_IF.v.
You need a PIO for the interface, find the pin assignment for the pio
from the docu in nand512w3a.c
The pio can be created directly in SOPC builder with the Altera tools.
Create the Nios now with the generate button.
Copy the *.ptf file to a convenient place in your Linux build directory.
Step2:
A hardwaredriver must be added in ~/linux-2.6.x/drivers/mtd/nand
How to write this driver is described in the MTD NAND Driver Programming Interface guide.
Modify Kconfig and the Makefile to make the module visible in
menuconfig.
Do this by replacing the files with the files from nand.zip from the
download section.
Step3:
Run make menuconfig now and choose following options:
Device Drivers ===>
Memory Technology Devices (MTD) ===>
[X] Memory Technology Device (MTD) support
[X] MTD partitioning support
[X] Direct char device access to MTD devices
[X] Caching block device access to MTD devicesNAND Flash Device Drivers ===>
[X] NAND Device Support
[X] your flash
The "your flash" option is our newly created board level driver.
Now compile the kernel, dont forget also to do the hwselect with the new *.ptf file.
After loading the kernel into RAM you should be able to see the NAND flash as a 64MB MTD partition.
Kernel 2.6.23:
How to create the SOPC component did not change.
However how to write the driver did change significantly.
Because there is no documentation even on the official website http://www.linux-mtd.infradead.org/
yet, I will describe how to modify existing drivers.
The new concept is that the driver does more work now. In 2.6.17 only
the lines to the chip have been serviced but data was read and written
from the core.
In 2.6.23 the read and write functions move to the driver.
1) Copy the write function from nand.c into your driver c file (for
example: nand512w3a.c):
/**
* nand_write_byte - [DEFAULT] write one byte to the chip
* @mtd: MTD device structure
* @byte: pointer to data byte to write
*
* Default write function for 8it buswith
*/
static void nand_write_byte(struct mtd_info *mtd, u_char byte)
{
struct nand_chip *this = mtd->priv;
writeb(byte, this->IO_ADDR_W);
}
2) Modify <yourchip>_hwcontrol function:
The original case for the service lines in nand512w3a_hwcontrol has to
be replaced with if else constructs.
ctrl is now a new parameter that is passed to the nand512w3a_hwcontrol
function.
The signallines can be found by masking the ctrl variable:
NCE line: ctrl & NAND_NCE
CLE line: ctrl & NAND_CLE
ALE line: ctrl & NAND_ALE
After servicing the signals write the cmd to the chip:
nand_write_byte(mtd,cmd);
3) this -> hwcontrol function has been replaced with this ->
cmd_ctrl
4) this->eccmode = NAND_ECC_SOFT; has been replaced by
this->ecc.mode = NAND_ECC_SOFT;
In the download section there are 2 drivers available (nandflash.zip):
The next step is: We want a filesystem on the MTD partition.
There are 2 choices:
JFFS2 and YAFFS
JFFS2 is included in the kernel sources, but is slower than YAFFS.
YAFFS is not in the uClinux distribution, but is optimized for NAND
flashes and faster than JFFS2.
Both filesystems worked on my custom board.
Journalling Flash File System 2 can be directly configured in menuconfig.
File systems ===>
Miscellaneous filesystems ===>
[X] Journalling Flash File System v2 (JFFS2) support
[X] JFFS2 write-buffering support
In order to be able to mount the JFFS2 it is necessary to format our MTD partition.
Buildroot:
For this we need the mtd-tools package.
Download the mtd-utils-1.0.0.tar.gz from http://www.linux-mtd.infradead.org/
Compile the utility eraseall for the Nios.
Copy the executable to the rootfs directory for example into the
directory /sbin and compile the kernel and root filesystem.
uClinux-dist:
Enable the mtd-utils in "Customize Application/Library Settings" with
make menuconfig
Flash Tools ===>
[*] mtd-utils
[*] eraseall
After logging in on our Nios do following:
Format the Nand flash:
Cmd: eraseall -j /dev/mtd0
The -j parameter stands for jffs2 and copies cleanmarkers into the
OOB area of the flash.
Note: without the -j parameter the flash cannot be mounted and
cleanmarker errormessages appear.
Now mount the flash:
Cmd: mount -n -t jffs2
/dev/mtdblock0 /mnt
Troubleshooting:
1) "eraseall : mtd0 : No such device or address"
Possible reason: "Direct char device access to MTD devices" in
menuconfig is not checked and Device can not be opened.
2) "Cleanmarker node not detected in block at XXXX"
Possible reason: Flash is mounted without formatting it with eraseall -j
3) "eraseall: /dev/mtd0: MTD Erase failure: Input/output error"
Possible reason: If you get this message for each block than probably
write protection is on. Check the WP pin
Benchmarks:
On my Nios running at 44MHz and mounting the entire Nand as 64MB
partition I got the following results:
| Action | Time in seconds |
|---|---|
| Mount | 36 |
| Write: copy 1 MB block to it with: dd if=/dev/zero of=/mnt/test.bin bs=1024 count=1024 | 25 |
| Read: dd if=/mnt/test.bin of=/test.dat | 2 |
| Delete: rm /mnt/test.bin | <1 |
| Umount | <1 |
The above timing table shows that the performance is not very good.
Better performance can be achieved with YAFFS
Yet Another Flash File System is not in the official kernel sources
yet. Therfore the sources need to be downloaded and added to the kernel
tree.
The sources are up to date and support all kernels up to version 2.6.19
Download the sources from http://www.aleph1.co.uk choose download tarball at
the bottom of the website
Extract the tarball and copy the directory yaffs2 into the kernel tree
under ~/linux-2.6.x/fs
Add the Kconfig entries to the Kconfig entries in the directory
~/linux-2.6.x/fs by just pasting them into this file
Recover the Makefile by removing the extension .kernel from
Makefile.kernel.
Run "make menuconfig" now and check following:
File systems ===>
Miscellaneous filesystems ===>
[*] YAFFS2 file system support
[*] Autoselect yaffs2 format
[*] Cache short names in RAM
Now compile the kernel.
In order to be able to mount yaffs2 it is also necessary to format the
flash first.
Format the Nand flash:
Cmd: eraseall /dev/mtd0
The -j parameter must be omitted.
Note: it is very important that there are no cleanmarkers in the OOB
area, otherwise the filesystem thinks that there is no free blocks left
on the flash
Now mount the flash:
Cmd: mount -n -t yaffs2
/dev/mtdblock0 /mnt
Note: automatically you will find a directory lost+found with
512 bytes which cannot be removed.
Troubleshooting:
1) "eraseall : mtd0 : No such device or address"
Possible reason: "Direct char device access to MTD devices" in
menuconfig is not checked and Device can not be opened.
2) "!!!!!! Allocator out !!!!!!"
Possible reason: If this happens even if you have plenty of space than
the flash was probably formatted with the -j parameter
3) "eraseall: /dev/mtd0: MTD Erase failure: Input/output error"
Possible reason: If you get this message for each block than probably
write protection is on. Check the WP pin
4) 2048 byte page NAND flash does not work with kernel 2.6.17, an
update to kernel 2.6.23 is needed
Benchmarks:
On my Nios running at 44MHz and mounting the entire Nand as 64MB
partition I got the following results:
| Action | Time in seconds |
|---|---|
| Mount | 10 |
| Write: copy 1 MB block to it with: dd if=/dev/zero of=/mnt/test.bin bs=1024 count=1024 | 10 |
| Read: dd if=/mnt/test.bin of=/test.dat | 2 |
| Delete: rm /mnt/test.bin | <1 |
| Umount | <1 |
As you can see the yaffs2 filesystem is about a factor 2 to 3 faster than jffs2.
| description | version | kernel | dist | package/file |
|---|---|---|---|---|
| class.ptf | class.ptf | |||
| nios_0.ptf | nios_0.ptf | |||
| Nios2-Verilog | Nios2-Verilog | |||
| ISP1761 | 2.6.23 | isp1761 isp1761.diff |
||
| dm9000a | 2.03a | 2.6.23 | dm9000a | |
| nand512w3a/nand01gw3b2b | 2.6.23 | nandflash | ||
| OpenSSL | 0.9.7e | 2.6.x | uClinux-dist-20060803 | openssl.zip |
| boa | 0.93.15 | 2.6.x | uClinux-dist-20071107 | boa |
| dhcpcd | v.1.3.22-pl4 | 2.6.x | uClinux-dist-20071107 | dhcpcd |